Using a Blackmagic ATEM Switcher With Dante Audio
A match that could be made in heaven!
As you may know, if you have seen any of my previous posts, I had a bit of downtime recently (mainly due to me being an idiot) and I have lost a lot of my old posts (somewhat down to me being an idiot and partly my backup corrupted). One of my most popular posts shared my theory for using Dante Audio with a Blackmagic ATEM Vision Mixer, and unfortunately, I lost that during my struggle to get back my little corner of the internet. It has allowed me to refine said idea though. So that’s what today’s post is all about.
In my original post, I said to get a MADI to Dante converter and you’re golden. Not quite, as one of the commenters pointed out, technically this would work, getting the audio into the ATEM, but you would have no control over the delay that might be introduced between the camera feed and the audio coming from the venue.
This did get me thinking and my solution is to add a digital audio mixer into the mix to control not only the delay but also any effects, EQing and levels too. This would mean that you may need an additional sound person if there isn’t one in-house who knows how to mix for the venue and video at the same time but the extra functionality makes a difference.
I thought I’d use this as an excuse to create another one of my shopping lists, I know you all love them as much as I do really… even if you don’t say it out loud. I just wish I had the money to test these theories.. one day maybe.
Don’t worry though I’m not going to go all in and do a full rig setup just now I’m just going to look into what kit I think I’ll need to get the conversion running smoothly. As per usual with these shopping lists, this is a bit of a thought experiment more than anything so if you think I’ve missed something or I’m using the wrong kit please drop a comment below, I read all of them and love getting the feedback.
Finding the right ATEM Switcher
So with that out of the way let’s get started. Now the first thing we are going to need to do is pick an ATEM switcher. Over the last couple of years, Blackmagic has been slowly adding MADI support to their constellation and Television Studio Switchers. I love the Television Studio switchers and if was running a show or event that needed 8 channels or less I’d go for one of these as I love that they have a built-in control interface.
Sidenote: The only thing that annoys me is that the Television Studio 4K8 doesn’t have an ISO model so if you were to use all of the 8 SDI inputs you would need to use 8 of the 12 SDI outputs to be able to record each of the video feeds. That doesn’t give you a lot of wiggle room, should you need it, for secondary video outputs. You also lose out on the automatic generation of the DaVinci Resolve file which speeds up the post-production workflow. I know it would add additional cost but I would be quite happy to buy an extra M.2 for each channel.
If you need more than 8 video feeds, then you’re going to need to go for one of the ATEM Constellation Switchers. Here we have a variety of models to choose from with a choice of 3 Resolutions (HD, 4K and 8K), and 1 option for the number of M/Es (Mix Effects) and Channels, the 4 M/E models that have 40 Channels. You can think of the M/Es as different video outputs that access all the same video inputs, you can also you these outputs as additional inputs but that may just complicate things.
Multi M/Es do come in handy though, if you are working across multiple stages at the same event. For example, if you have 3 stages you could have an individually mixed output for each stage and a fourth output that switches between all three for a scheduled broadcast of the best bits or if you have a screen in a common area that people can watch. I wanted to do something like this If we went back to do another year of the Beverly Folk Festival but that wasn’t to be.
The main feature of all of these options though, well at least in this instance, is that the 4 M/E Constellation Switchers and the Television Studio models have MADI built into them. You’ll usually find MADI in higher-end production houses that have the budget to spend on sending all of this audio through the building to various places with multiple SDI cables. For folks like me with little to no budget on a show then it’s not an option, hence the conversion to Dante.
Having MADI on the ATEM range gives us an additional 32 channels of audio into the Switcher and 64 Channels of audio coming out of the switcher over 3 SDI Cables (1 for audio in and 2 for audio out). We Can utilise these with a Madi to Dante converter to allow us to be able to not only use the audio from in the venue but also send audio to the venue from feeds video sources that may be required to be played back in-house on a projector screen, for example. Because we’ll be sending a stereo feed of each channel we don’t need to worry about the difference in levels between the Video stream and recording and the venue sound system as the venue sound engineer can adjust the audio feeds as they need and separately in case you have one video source that is louder than the others.

So now to choose an ATEM. When I was working events, if I had room in the budget, I’d like to use at least 3 cameras (4 if possible) and have two graphics feeds (with key and fill) for live graphics and video playback. So that’s 8 channels straight off the bat without even thinking about any additions the client might have such as laptop feeds for presentation or specialist cameras for top-down shots etc. I also like to shoot in 4K this gives me the ability to crop in during post and produce a high-quality 1080p version of the event for the client to use how they see fit, be it internally or on their socials. So generally if I have a choice I’ll go for the ATEM Constellation 4 M/E 4K.
I not only get the channels I need and a few spare, but if I get the chance to do a multi-stage event again I can use 1 switcher and have a 1 M/E Advanced Control Panel on each stage and a final one to do a mix of the three.
That’s the first item added to our shopping list then. Now the Blackmagic website shows this would be £7,479 +VAT but I’ve managed to find it on CVP for £6795 +VAT (£8154). I’ve not included any Control interfaces as part of this shopping list as these will vary depending on the needs of the event.
Converting MADI to Dante
Now we have the Switcher picked out it’s time to have a look at how we convert the MADI audio in the ATEM to Dante used in the venue. Before we look into the solution I think might work. It’s worth looking into what MADI and Dante are so we have a better understanding of the technologies.
MADI
Multichannel Audio Digital Interface (MADI), Standardised as AES 10 by the Audio Engineering Society, defines the data format and electrical characteristics of an interface that carries multiple channels of digital audio. The MADI standard supports serial data transmission over Coaxial Cables or Fibre-optic lines of 28, 56, 32 or 64 channels of audio at sample rates of 96 kHz and above with an audio bit depth of up to 24 bits per channel. It is a unidirectional interface from one sender to one receiver.
Dante
Dante is the product name for a combination of software, hardware and network protocols that deliver uncompressed, multi-channel audio over a standard ethernet network using Layer 3 IP packets. It was developed in 2006 by Audinate and was built on previous audio over ethernet and audio over IP technologies. Dante has a maximum of 1024 channels per link (512 send 512 receive), a maximum sample rate of 192 kHz and a maximum bit depth of 32bits. [These figures alone are reason enough to use Dante over MADI in my eyes but I digress.] Dante also has the advantage of being able to be routed rather than using a direct link. Dante has become somewhat of an industry standard over the last few years and has been included in a wide variety of products from professional audio equipment manufacturers either directly or via additional interface cards.
Conversion Hardware
So now we know a little about MADI and Dante let’s look at some options for our conversion hardware. Now at this point, I have to admit, I jumped straight on to my favorite website for Audio and Light gear, Thomann, and had a look at what conversion options they had available.
After looking at all of the options available on the website I decided to go for the Ferrofish Verto MX Multimode in this instance. The other options still only provided the same number of channels but cost more for the same features so trying to be as budget-friendly as possible I went with this.
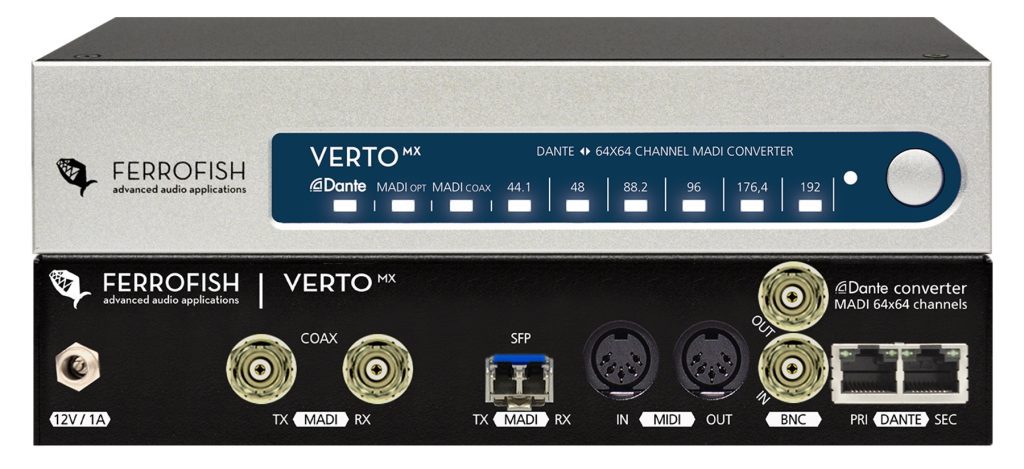
The Ferrofish Verto MX Multimode can convert MADI to Dante on each of its 64 channels at up to 192kHz at 24bt depth. Considering the max bit-depth of Madi is 24 bit this is fine. It has BCN and Optical MADI inputs and outputs and can also do midi over Madi.
Audio Console
Whilst we can now convert the Dante audio to MADI and get it into our Switcher we have a bit of a problem. Whilst the ATEM switchers can add a delay to the audio to help match everything up this is only possible on the analogue audio inputs built into the switcher and not on the MADI channels. This is a real shame as the Fairlight audio mixer built into the ATEM switchers gives each input a 6-band parametric EQ, compressor, limiter, expander and noise gate as well as full panning. All inputs are metered so you can always see your source’s levels and there are buttons to turn audio on for each source and for audio to follow video (AFV). The only thing missing is the feature we need most when using external audio input… the delay.

To work around this my suggestion would be to use an external Dante-enabled audio console. Which console you go for is up to you, as I know every sound engineer has their preference. I have had great experiences in the past with Yamaha’s LS9 range of desks, unfortunately, they no longer produce this model. They do however have a couple of product ranges that can match different budgets. There are the budget-friendly AM & TF ranges and the not-so-budget-friendly QL range. As much as I would like to shell out £29290 for the SM7-EX bundle I’m not made of money. So I’ll be going for the midrange TF-5 + a Dante Expansion card.
The Mixer itself has 32 Analogue XLR inputs and 16 Analogue XLR outputs, 24 track multi-tracker recorder, 8 FX processors, Parametric EQ and 2 Dynamics per channel, and Programmed Sound Presets that allow you to tweak each channel for the microphone that is being used.
When we add in the Dante Expansion Card this gives us an additional 64 Channels in and out. This allows us to bring the audio fees in either via the built-in analogue inputs or a Dante Stage box, apply any delay or effects and send them back out over one of the 64 Dante audio outs and into the ATEM solving the issue of the delay between audio and video.
Conclusion
Now we’ve had a look at everything it’s time to put it all into our shopping list. Now the total cost may be different for you depending on the switcher you decide to go with, your conversion solution and the audio console. For the setup I’ve decided on today, we’ve got a total spend of £14,112 not including any advanced control panels, cameras, playback etc. I’ll likely create a new shopping list in the not-too-distant future.
Obviously, your mileage may vary but I think this isn’t a bad solution to get Dante audio from your venue and into your ATEM switcher and deal with the delay between audio and video.
| Product | Cost | QTY | Total |
|---|---|---|---|
| Blackmagic ATEM 3 M/E Constellation 4K | £8,154 | 1 | £8,154 |
| Ferrofish Verto MX Multimode | £1,350 | 1 | £1,350 |
| Yamaha TF-5 | £3,999 | 1 | £3,999 |
| Yamaha NY64-D Dante | £609 | 1 | £609 |
| Total | £14,112 |
If you think I’ve missed something, either kit or a part of the process, or you have another idea on how we may be able to do this even cheaper, then let me know in the comments below.